Create/Edit Tables
Tables can be used when tabular data needs to be placed within a page. Tables should not be used to create column layouts. If you need help adding column layouts to your page, submit a request using the Web Help Form.
Add A Table
- Select the Tables icon
 from the WYSIWYG Toolbar
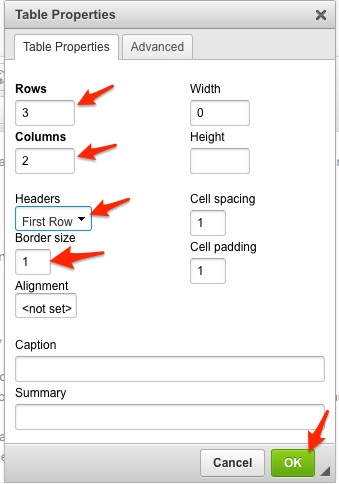
 - In the pop-up window that appears, enter the following information into the appropriate
fields:- Numbers of Rows
- Number of Columns
- Width (we recommend leaving this blank to make the table adapt to the full width of the page)
- Headers (If you would like the top row of your table to stand out from the rest, select First Row from the drop-down menu. Otherwise, select None). See examples of table styles.
- Click OK

- Once you click ok, you will see a table in the editable region. Begin adding your content in the appropriate rows and columns.
- Select Save at the bottom of the page to save your work and preview what your table will look like when live.
Edit a Table
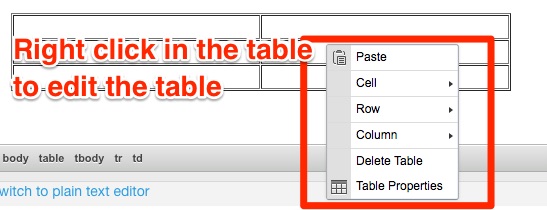
Once a table is on your page, you can add/remove columns, rows, and headings by right-clicking on the table to display the menus that are available for that specific function. 
- To add a row, place your cursor in the row above or below of where you want the new row added. Right-click, and from Row, select Insert Row After or Insert Row Below. To remove a row, right-click inside the row or column you wish to remove, and from Row, select Delete Row.
- To add a column, place your cursor in the column to the right or left of where you want the new column added. Right-click, and from Column, select Insert Column After or Insert Column Below. To remove a column, right-click inside the column you wish to remove, and from Column, select Delete Column.
- To add or remove first row headers, right-click inside the table and select Table Properties. From there, change the selection under Headers.
Remove a Table
To remove a table:
- Right-click on the table display
- Select Delete Table
The table and the content in its cells will be removed.


