Use the Legacy SEP in MyDelta

Delta has implemented a new Student Education Planner (SEP) where you can build your educational plan, work closely with your counselor, and avoid any roadblocks that might delay achieving your goals.

Access the New Student Education Planner via:

MyDelta Dashboard


The following information below pertains to the legacy planning inside MyDelta. We encourage all students to use the new planner!

How to Legacy Access the Planner 

  1. Log in to MyDelta
  2. Click on the Manage Classes Tile from your MyDelta homepage
  3. From the Sidebar, click on Planner
 

Add a Course to Your Planner

You can add courses to your planner via the Course Catalog or from My Requirements in your Academic Progress tile.

Please note: Adding a course from My Requirements is not currently set up and will be available in a future release of MyDelta.

Add a Course from the Course Catalog

From the Planner, click on Add from Course Catalog. This will take you to the search box to browse the course catalog. (Need help searching the course catalog? Read our Course Catalog Guide)

  1. Use the Course Catalog search to find a course you're interested in
  2. From the search results, click on the course name to view the course information page
  3. Click on the Add to Planner button in the top right corner of the course information page
  4. You will see a notification at the top of the page confirming that the course has been added to your planner.

Once the course has been added to your planner, you can navigate to the Planner from the Manage Classes tile in your MyDelta Homepage to assign the course to a specific term.

Add a Course from My Requirements

From the Academic Progress in MyDelta, you can find courses that satisfy one of your graduation and/or degree requirements and add the course to your planner.

  1. From your MyDelta homepage, click on Academic Progress.
  2. Click on the Academic Progress link from the left sidebar to display your Academic Progress Report.
  3. From the Academic Progress Report, click on on one your Not Satisified requirements.Click anywehre in the row of the requirement
  4. Under Courses, you will see a list of courses that may be used to satisfy this requirement.
  5. Click anywhere in the row of a course you want to learn more about and/or take
    Click on the row to see more information
  6. This will open up Course Details including description, units, grading, and attributes
  7. Click the Add to Planner button to add the course to your planner. Learn more about the Planner  

    Arrange Your Plan

    When you add courses to your planner, they are initially placed in Unassigned Courses within your Planner until you assign the course to a specific term. 

    1. From your MyDelta homepage click on the Manage Classes tile and then click on Planner from the left sidebar.
    2. Click on Unassigned Courses to view all courses that have been added to your planner but have not been added to a term
    3. From Unassigned Courses, click on the name of the course you wish to assign.
    4. This will display the course information page. Click on the Move to Term button.
    5. A modal will display. From the dropdown menu in the modal, select the term you want to assign the course to.

    The course will now be added to the term you specified.

    Have your plans changed? You can always move the course to a different term by selecting the term from Planner (i.e. Fall 2019), select the course and then repeat the steps above to move the course to another term. 

    Register for Classes in Your Planer

    When it's time to register for a term, you can add the courses in your planner directly to your schedule. 

    1. From your MyDelta homepage click on the Manage Classes tile and then click on Planner from the left sidebar.
    2. Click on on the Term you want to register for (i.e. Fall 2019)
    3. Click on the Course you want to add to your schedule.
    4. This will open a page will information about the course. If the course has classes scheduled for that term, there will be a View Classes button in the upper right corner. Click the button to choose the class you want to add.
      • If there is no View Classes button the schedule for that term may not be published yet or there may not be any classes offered for that course in the term you are planning for. 
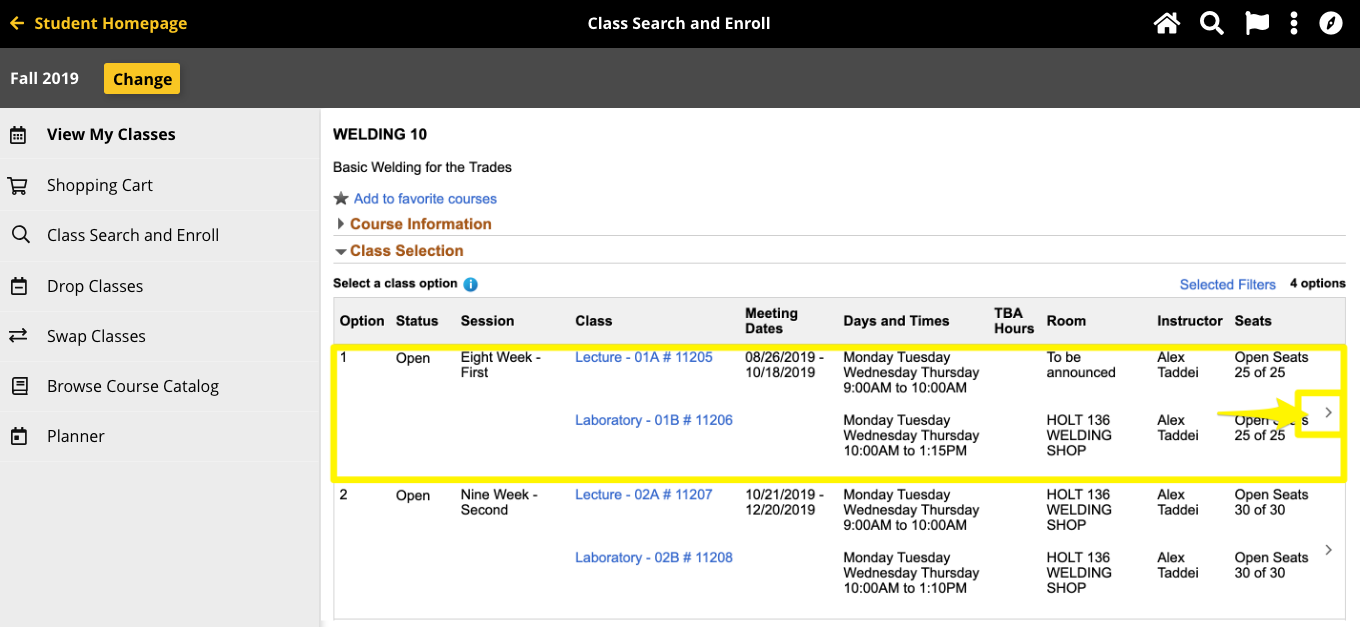
    5. After clicking View Classes, a new page will load with all the class options for the term. 
    6. If you are ready to add the class, look for the arrow pointing right on the far right of the row of the class.  If there is no arrow, enrollment for the term may not be open or you may be ineligible to add the course. If there is an arrow, click anywhere on the row of that class to start the process of registering for the class.Pick a class
    7. After selecting the course, the Review Class Selection step appears. Review the class to confirm this is the class in which you would like to enroll or add to the shopping cart. Once confirmed, click Next.
    8. Next, Review Class Preferences. If the course is full, here’s where you can request to be added to the waitlist. Choose Yes or No, and then click Accept to continue.
    9. The Enroll or Add to Cart page appears. Select whether you wish to register in the class or Add to Shopping Cart. If your enrollment appointment date has not arrived for the term, you will only be able to select Add to Shopping Cart.
    10. The Review and Submit page appears. Click on any of the previous steps on the left to review and change options if needed. If the class displayed is correct and all preferences are set correctly, click Submit.
    11. Click Yes to confirm the submission of the class choice and enroll in the class.

    The course will now be added to your schedule for the term you specified.